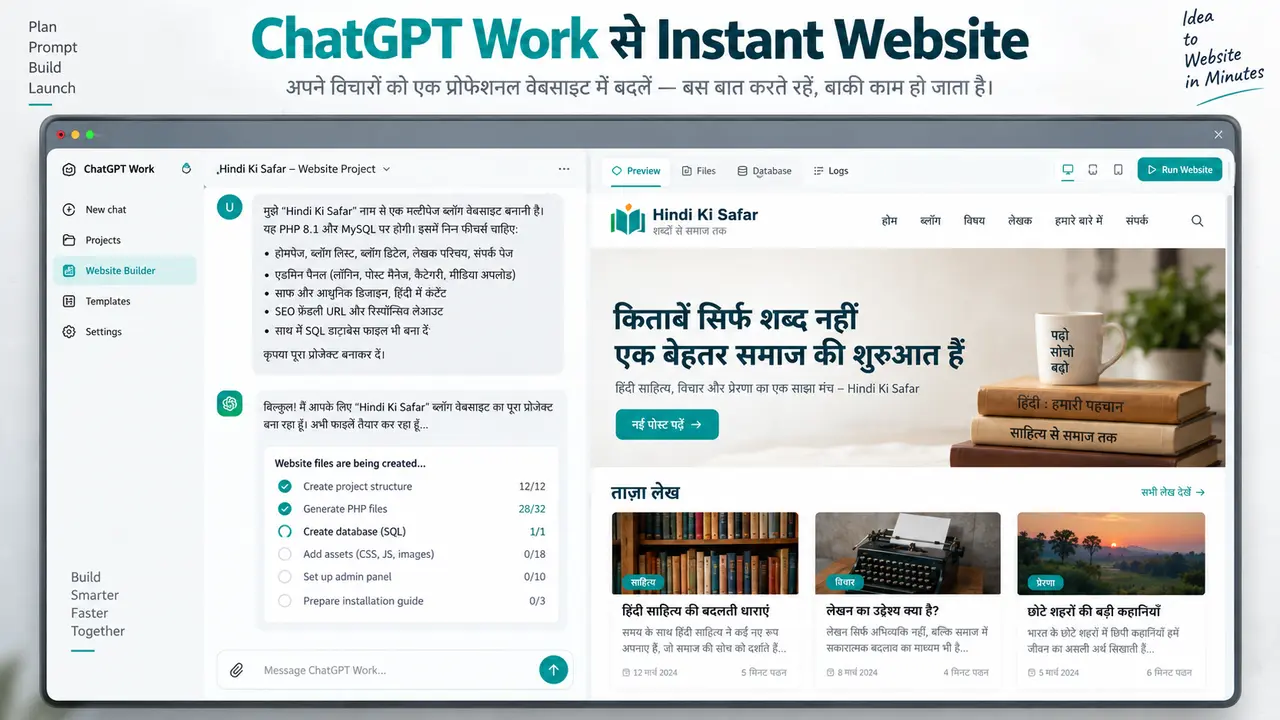
कुछ समय पहले तक AI से website बनवाने का मतलब केवल एक अच्छा सा home page या HTML demo तैयार कर लेना था। अब ChatGPT Plus के Work interface में आप project brief दे सकते हैं, reference files जोड़ सकते हैं, बीच में direction बदल सकते हैं और अंत में पूरा source code, database installer तथा downloadable ZIP ले सकते हैं। लेकिन इसका सही result तभी मिलता है जब आप AI को केवल “website बना दो” न लिखकर business, pages, technology और admin access साफ-साफ बताते हैं।
इस guide में हम किसी काल्पनिक demo की बात नहीं करेंगे। हमने hindikisafar.com के लिए “Hindi Ki Safar” नाम का पूरा हिंदी blog project इसी process से तैयार किया। शुरुआत WordPress theme के विचार से हुई, बाद में requirement को Custom PHP 8.1 और MySQL में बदला गया। अंतिम package में responsive frontend, 12 starter articles, 5 categories, 6 pages, secure admin panel, post scheduling, media management, comments और web installer शामिल किए गए। यही real workflow आपको बताएगा कि ChatGPT Work से professional website बनाते समय कौन-सी command कब देनी चाहिए।
Quick Answer: ChatGPT Work से website बनाने के लिए पहले domain, purpose, pages, design, technology और admin features की detail दें। AI से पहले roadmap और project structure बनवाएँ, फिर website develop करवाएँ। उसके बाद mobile layout, forms, security, database और PHP syntax test करवाकर ZIP लें। ChatGPT Sites supported website को सीधे host कर सकता है, जबकि Custom PHP/MySQL project को Bluehost, HostArmada, ChemiCloud या किसी दूसरे compatible server पर upload करना होगा।
ChatGPT Plus और ChatGPT Work में फर्क क्या है?
ChatGPT Plus आपका paid plan है, जबकि Work एक ऐसा interface है जहाँ आप केवल जवाब लेने के बजाय पूरा outcome तैयार करवा सकते हैं। सामान्य Chat में आप code snippet या सलाह माँगते हैं। Work में आप कह सकते हैं कि project folder बनाइए, files तैयार कीजिए, images जोड़िए, tests चलाइए और final ZIP दीजिए। Official OpenAI documentation के अनुसार Work files, approved tools और multi-step workflows का उपयोग करके review करने योग्य finished output तैयार कर सकता है।
ChatGPT Sites इससे थोड़ा अलग है। Sites में prompt से hosted website या web app बनाई, refine की और share की जा सकती है। Plus सहित eligible paid plans पर Sites public beta में उपलब्ध है, लेकिन plan-specific usage limits लागू रहते हैं। Supported Sites project को managed hosting पर publish किया जा सकता है, जबकि PHP और MySQL जैसी traditional server technology वाली website के लिए external hosting जरूरी होगी। इसलिए “Instant Website” का अर्थ यह नहीं कि domain, hosting और business testing अपने आप खत्म हो जाते हैं; इसका अर्थ है कि development का पहला बड़ा हिस्सा बहुत कम समय में तैयार हो सकता है।
यदि आपका लक्ष्य केवल landing page, calculator या छोटा interactive tool है तो Sites उपयोगी हो सकता है। यदि आपको cPanel hosting, PHP files, MySQL database और अपना admin panel चाहिए, तो Work से downloadable custom project बनवाना बेहतर रहेगा। इसी तरह AI से बनी website को Google और AI search के लिए तैयार करने हेतु हमारी AI Ready Business Website guide भी पढ़ सकते हैं।
पहली command से पहले Project Brief कैसे तैयार करें?
AI को website का नाम बताना पर्याप्त नहीं है। अच्छा brief कम से कम छह बातें साफ करता है: website किसके लिए है, visitor क्या करेगा, कितने pages चाहिए, content categories क्या होंगी, technology कौन-सी होगी और owner को किस प्रकार का admin access चाहिए। आप reference screenshot, पसंद की color palette और किसी website का design link भी जोड़ सकते हैं। इससे AI को बार-बार अंदाजा नहीं लगाना पड़ता।
हमारे case में शुरुआती brief लगभग ऐसा था: “Domain hindikisafar.com है और website का नाम Hindi Ki Safar होगा। इसमें Hindi book reviews, motivational summaries, facts, quotes और Hindi Sahitya के articles रहेंगे। यह complete blog website है।” इस एक paragraph ने brand, audience और content direction तय कर दी, लेकिन website को production-ready बनाने के लिए हमने अगले prompts में pages, admin panel और technology को अलग-अलग स्पष्ट किया।
एक professional website prompt में domain, website name, target visitor, required pages, content categories, design preference, technology, admin features और final delivery format जरूर लिखें।
Domain चुनना भी project planning का हिस्सा है। केवल अच्छा सुनाई देने वाला नाम लेने के बजाय renewal, ownership और brand matching देखना चाहिए। इसके लिए Domain खरीदने से पहले किन बातों का ध्यान रखें और Domain Name SEO को कैसे प्रभावित करता है guides उपयोगी रहेंगी।
हमारी Commands ने Hindi Ki Safar Project को कैसे बदला?
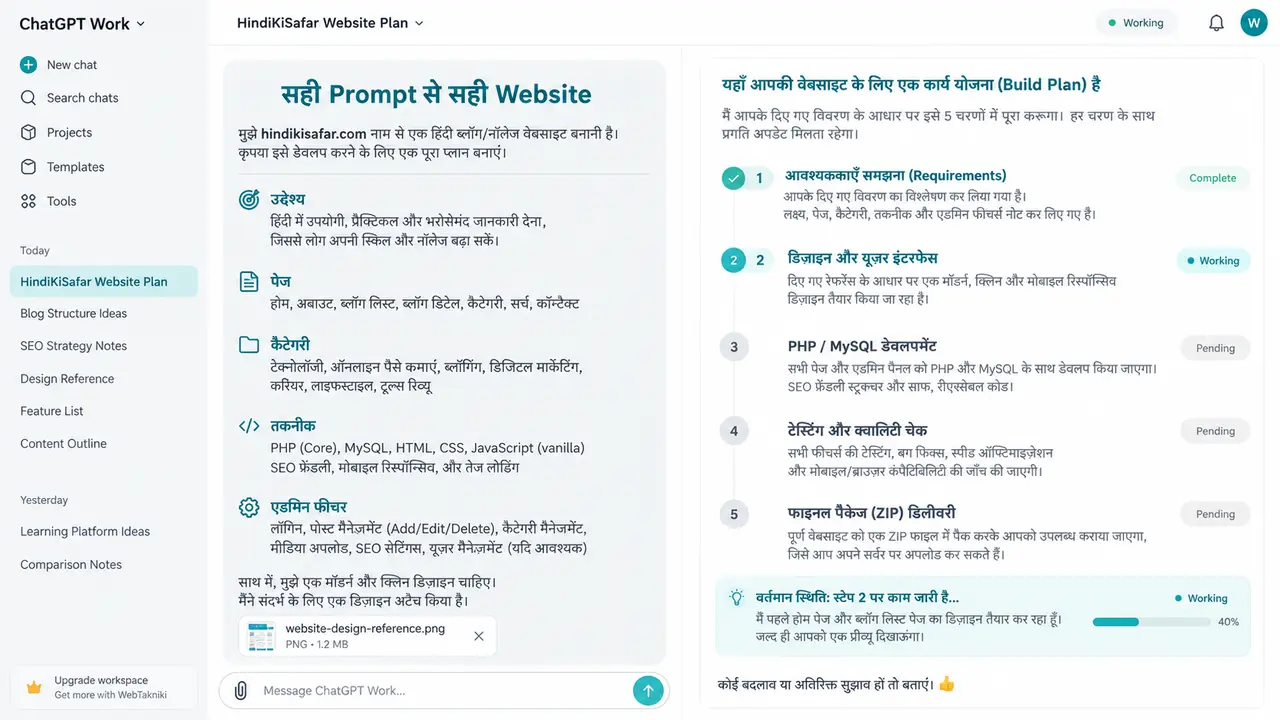
सबसे पहले हमने category direction बदली और Server Web Development से जुड़े पांच practical articles का roadmap माँगा। फिर पहले article के लिए एक real project दिया—Hindi Ki Safar। अगली command में साफ किया कि यह केवल design mockup नहीं, बल्कि complete blog website होनी चाहिए। इससे AI ने homepage के साथ article archive, single article, category, search, contact और जरूरी static pages का structure तैयार किया।
इसके बाद सबसे महत्वपूर्ण command थी: website ऐसी हो जिसमें post add, edit और delete किए जा सकें तथा WordPress dashboard जैसी जरूरी access मिले। शुरुआत में WordPress theme और companion plugin वाला package तैयार हुआ, लेकिन project requirement बदल गई। हमने सीधी command दी—“WordPress में नहीं, PHP में ही बनाइए।” Work का फायदा यही है कि आप बीच में technology बदल सकते हैं और AI को नया architecture बनाने के लिए कह सकते हैं।
नई requirement के बाद project को PHP 8.1 + MySQL CMS में बदला गया। इसमें web installer, PDO prepared queries, secure login, password hashing, CSRF protection, role-based access, safe image upload और scheduled publishing जोड़े गए। Admin, Editor और Author roles बनाए गए। Dashboard से posts, categories, pages, media, comments, contact messages, users और website settings manage की जा सकती हैं।
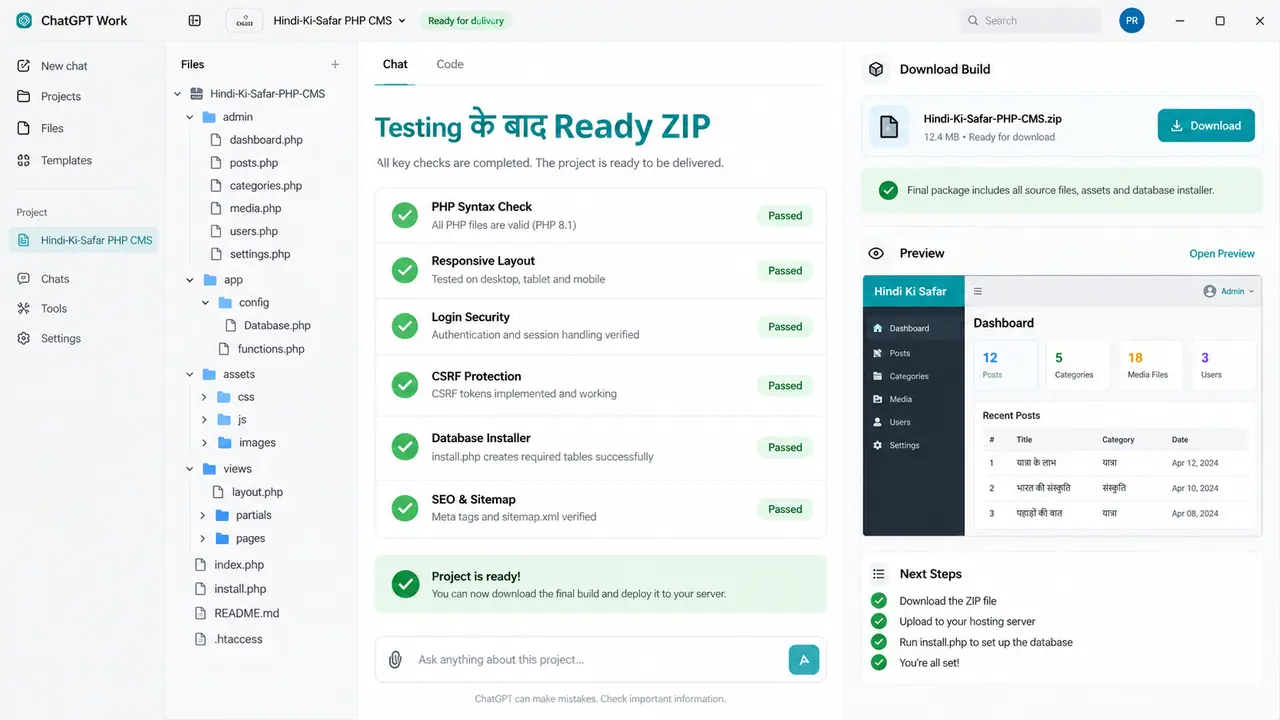
जब हमने जल्दी final ZIP माँगी, तब केवल files compress नहीं की गईं। पहले सभी PHP files पर PHP 8.1 syntax check चलाया गया, starter data verify हुआ और archive test किया गया। Final ZIP में 5 categories, 12 starter posts, 6 जरूरी pages और installation guide मौजूद थे। यही difference एक AI demo और usable client project के बीच होता है।
Copy-Paste Prompt: Custom PHP Website बनवाने का सही तरीका
नीचे का prompt अपने project के अनुसार बदल सकते हैं। इसे एक साथ देने से Work को outcome साफ समझ आता है। यदि आपके पास logo, content document या design screenshot है तो prompt के साथ attach करें।
मेरे लिए [DOMAIN NAME] के लिए [WEBSITE NAME] नाम की complete multipage website बनाइए।

Website का उद्देश्य: [BUSINESS/BLOG/SERVICE]
Target audience: [AUDIENCE]
Required pages: Home, About, Services/Articles, Single Detail, Contact, Privacy Policy
Content categories: [CATEGORY LIST]
Design: clean, modern, mobile responsive और fast-loading
Technology: PHP 8.1+, MySQL, HTML, CSS और JavaScript

अपना admin panel दीजिए जिसमें secure login, post add/edit/delete, draft, publish, scheduling, category, page, media, contact messages, users और settings manage हो सकें।

PDO prepared statements, password hashing, CSRF protection, safe image upload, SEO title, meta description, sitemap.xml और robots.txt शामिल करें।

Installation के लिए web installer और README बनाइए। सभी PHP files test करने के बाद final installable ZIP दीजिए।
पहले prompt के बाद preview देखकर specific changes दें। “Design अच्छा नहीं है” लिखने के बजाय बताइए कि header modern चाहिए, hero में image किस तरफ हो, homepage में कौन-से sections कम या ज्यादा हैं और mobile menu कैसे दिखना चाहिए। यदि AI ने single-page project बनाया है तो साफ कहें कि 5–10 अलग pages चाहिए और सभी navigation links working होने चाहिए।
Design से Admin Panel और Database तक पूरा Workflow
पहले चरण में roadmap और information architecture बनवाएँ। इसमें pages, navigation, user journey और database entities तय होनी चाहिए। Blog project में posts, categories, users, media, comments और messages अलग data entities होंगे। Booking website में rooms, availability, bookings और payments अलग tables बन सकते हैं। Architecture पहले तय होने से बाद में code बिखरता नहीं है।
दूसरे चरण में homepage और common layout बनवाएँ। Header, footer, color system, typography, buttons और cards सभी pages पर consistent होने चाहिए। Desktop preview के साथ mobile width पर भी design देखें। केवल hero section देखकर approval न दें; archive, detail page, forms, empty state और 404 page भी check करें। Visitor आने के बाद customer क्यों नहीं बन रहा, यह समझने के लिए हमारी Website Conversion Optimization guide देखें।
तीसरे चरण में admin panel और database आता है। केवल login screen होना admin panel नहीं है। Owner को post add/edit/delete, category management, media upload, user roles, form messages और settings access मिलनी चाहिए। Scheduled post के लिए future date database में save हो और public query सही समय पर उसे दिखाए। Contact form को केवल email भेजने के बजाय database inbox में भी सुरक्षित रखा जा सकता है।
चौथे चरण में security और testing जरूरी हैं। Login password plain text में save नहीं होना चाहिए। Database queries prepared होनी चाहिए, form में CSRF token होना चाहिए और uploads में PHP जैसी dangerous file blocked होनी चाहिए। Error display production में बंद रहे। AI code लिख सकता है, लेकिन important forms, permissions और database backup को owner या developer को review करना चाहिए।
Hosting पर Website Live कैसे करें?
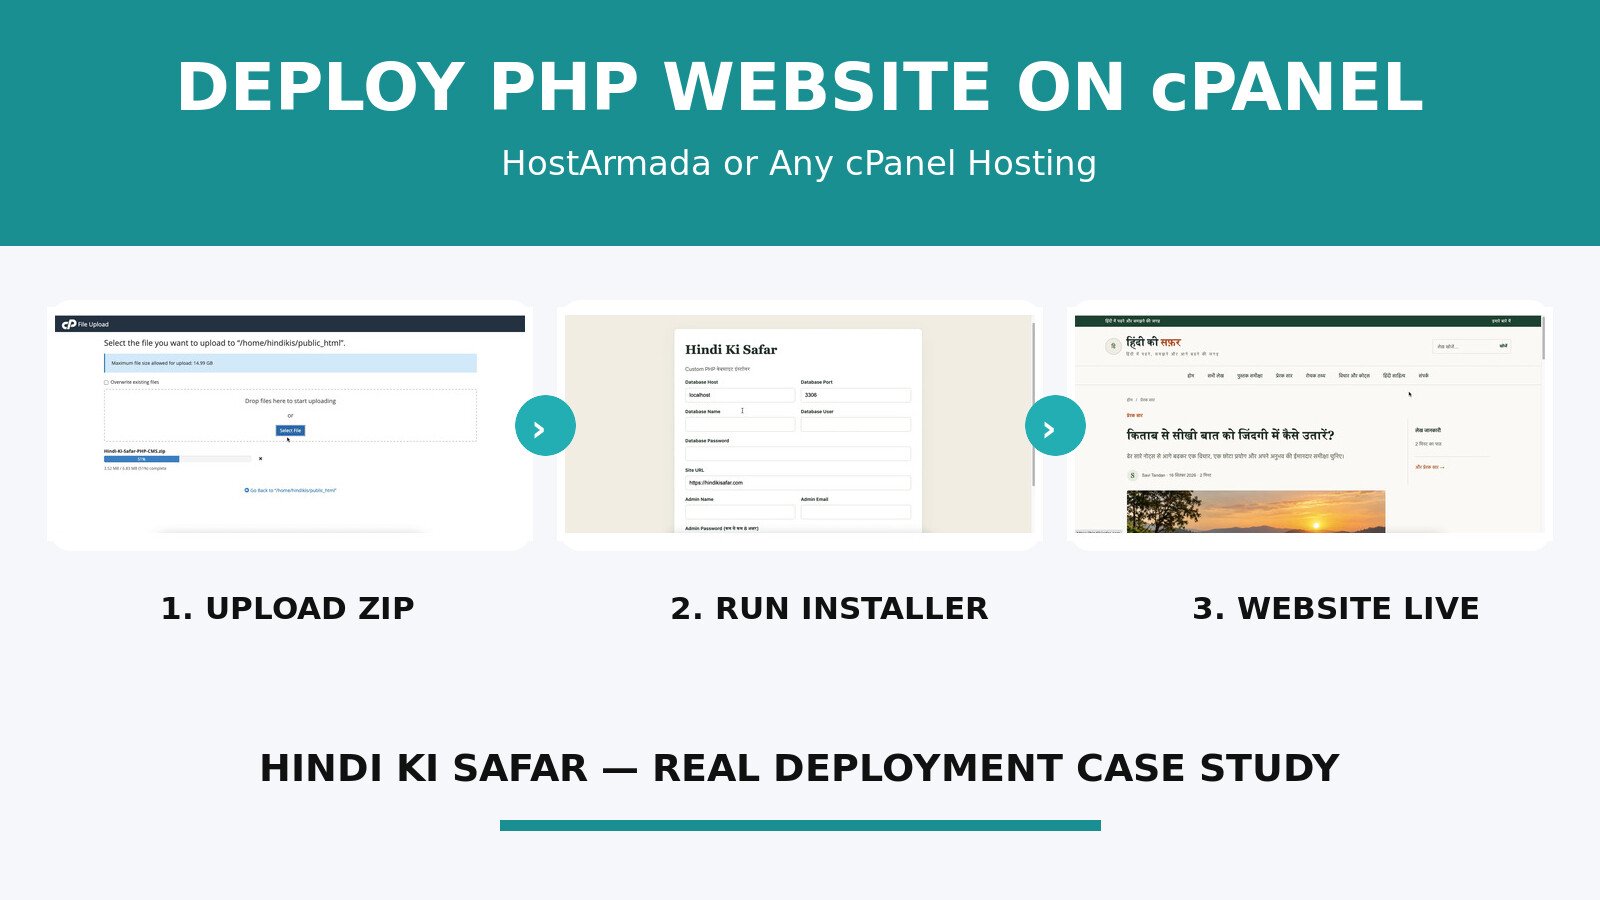
Custom PHP project की ZIP मिलने के बाद cPanel में नया MySQL database और database user बनाइए। User को database पर all privileges दें। ZIP को public_html में upload करके extract करें। फिर browser में yourdomain.com/install.php खोलकर database host, name, username, password, site URL और admin login भरें। Installation complete होने के बाद security के लिए install.php delete करना जरूरी है।
हमने इस तरह के project को Bluehost cPanel workflow के अनुसार तैयार किया, इसलिए beginner के लिए Bluehost hosting यहाँ देख सकते हैं। कम budget में managed cloud-style shared hosting चाहिए तो HostArmada plans उपयोगी विकल्प हैं। बेहतर support और आसान migration चाहने वाले ChemiCloud hosting देख सकते हैं। एक अन्य international option के रूप में FlashCloud hosting भी उपलब्ध है।
Affiliate disclosure: ऊपर दिए कुछ hosting links affiliate links हैं। इनके माध्यम से खरीदने पर हमें commission मिल सकता है, जबकि आपके लिए सामान्यतः अतिरिक्त cost नहीं बढ़ती। Hosting चुनने से पहले current plan, renewal price, server location और refund terms जरूर जाँचें।
AI Website में होने वाली सामान्य गलतियाँ
सबसे आम गलती vague prompt है। इससे AI आकर्षक लेकिन generic website बना देता है। दूसरी गलती हर बदलाव के साथ पूरा design बदलवा देना है। बेहतर तरीका है एक समय पर एक issue बताना—पहले structure, फिर style, फिर functionality और अंत में content। इससे पहले से working parts सुरक्षित रहते हैं।
तीसरी गलती preview को final मान लेना है। AI-generated website में broken links, form validation, missing mobile spacing, गलत file paths या database permissions की समस्या रह सकती है। Final ZIP से पहले syntax check, responsive test, login roles, upload restrictions और fresh installation test माँगें। Official OpenAI guidance भी generated content, links, forms, uploaded files और interactive behavior को publish/share करने से पहले review करने की सलाह देती है।
चौथी गलती SEO को बाद के लिए छोड़ना है। हर post और page में unique title, meta description, clean URL और internal links होने चाहिए। Sitemap और robots.txt भी बनवाएँ। AI search visibility पर काम करने के लिए AI Search SEO Guide और citation strategy के लिए AI Citation SEO Guide पढ़ें।
क्या ChatGPT Work से बनी Website Client को दे सकते हैं?
हाँ, लेकिन client delivery से पहले source code, licenses, forms, privacy requirements, backups और browser compatibility की जिम्मेदारी आपकी रहती है। AI developer की speed बढ़ाता है; वह business approval, legal compliance और production monitoring की जगह नहीं लेता। Client को ZIP के साथ installation steps, admin URL, backup process और किस file में configuration है यह बताना चाहिए।
सबसे practical model यह है कि AI से structure, repetitive code, responsive UI, documentation और first-level testing करवाएँ। फिर developer domain, hosting, DNS, database, security hardening और real content की final review करे। इससे काम तेज भी होता है और control भी आपके पास रहता है।
अक्सर पूछे जाने वाले सवाल
क्या ChatGPT Plus में website hosting free मिलती है?
ChatGPT Sites eligible paid plans पर supported websites को managed hosting में publish कर सकता है। लेकिन Custom PHP/MySQL project के लिए अलग compatible hosting चाहिए। Plus subscription external domain या third-party hosting plan को शामिल नहीं करती।
क्या coding knowledge के बिना website बना सकते हैं?
Basic website और first working version बनाया जा सकता है, लेकिन domain, database, security, backup और errors समझने की basic knowledge उपयोगी रहेगी। Business-critical project को live करने से पहले developer review बेहतर है।
WordPress और Custom PHP में क्या चुनें?
जल्दी content publishing, plugins और familiar dashboard चाहिए तो WordPress आसान रहता है। Lightweight custom workflow, controlled features और अपना admin panel चाहिए तो PHP/MySQL project उपयोगी हो सकता है। चुनाव maintenance skill और business requirements पर करें।
ChatGPT Work में usage limit क्यों दिखाई देती है?
Work और Sites में plan-specific usage limits हो सकती हैं। बड़े project, कई files, images और लंबी testing अधिक usage ले सकते हैं। इसलिए पहले complete brief दें, changes को grouped रखें और छोटे cosmetic revisions को एक साथ भेजें। Current limit हमेशा अपने plan interface में देखें।
AI से बनी website Google में rank करेगी?
केवल AI से code बन जाने पर ranking तय नहीं होती। Helpful original content, speed, mobile experience, technical SEO, backlinks, entity trust और regular updates जरूरी हैं। AI development time कम कर सकता है, ranking की guarantee नहीं देता।
निष्कर्ष
ChatGPT Plus और Work से instant website बनाना संभव है, यदि “instant” को fast, reviewable first version की तरह समझें। Hindi Ki Safar project में एक simple blog idea को Custom PHP 8.1, MySQL database, admin dashboard, scheduled posts, media library और installable ZIP तक पहुँचाया गया। इस पूरे process में सबसे महत्वपूर्ण चीज model नहीं, बल्कि स्पष्ट requirement, सही sequence में commands और final testing थी।
अपना अगला project शुरू करते समय पहले brief लिखें, फिर roadmap approve करें, उसके बाद design और functionality बनवाएँ। Technology बदलनी हो तो साफ command दें और final delivery से पहले test report माँगें। इसी workflow से AI केवल code generator नहीं, बल्कि आपके web development process का practical assistant बन सकता है।
Official references: Get started with ChatGPT Work और ChatGPT Sites documentation.